Summary
A circle involves the gymnast swinging their legs in a circular motion while transitioning through various support positions. The process begins in a push-up position, where the gymnast swings sideways and forward to rear support, then back to front support.
Circles are foundational for pommel horse skills, with 85% of skills derived from some form of circling. Mastery of this skill is crucial for overall performance.
- Basic Positions
- Front Support: Similar to a push-up, with hands under shoulders and body straight.
- Rear Support: Reverse of front support, with hips elevated and eyes looking at toes.
- Side Support: One hand under shoulders, body facing sideways, maintaining a straight line.
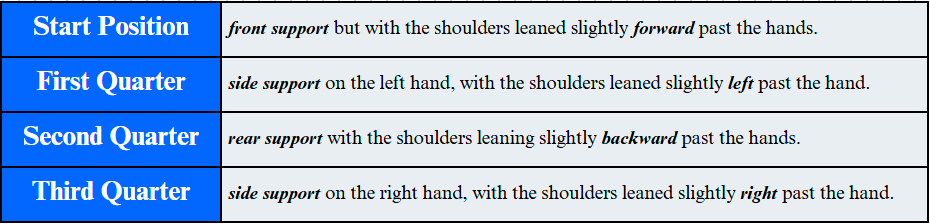
- Quarter Positions
- Start Position -> front support
- First Quarter -> side support
- Second Quarter -> rear support
- Third Quarter -> side support
To perform a circle, jump from start to first quarter, then to second, third, and back to start while maintaining body alignment.
Effective drills include:
- Static Holds: Front and rear support holds to build endurance.
- Support Sliders: Using sliders to practice weight transfer.
- Quarter Progressions: Walking, hopping, and jumping through quarter positions to develop skill.
Learning circles requires patience and consistent practice focusing on body positions and key performance points.
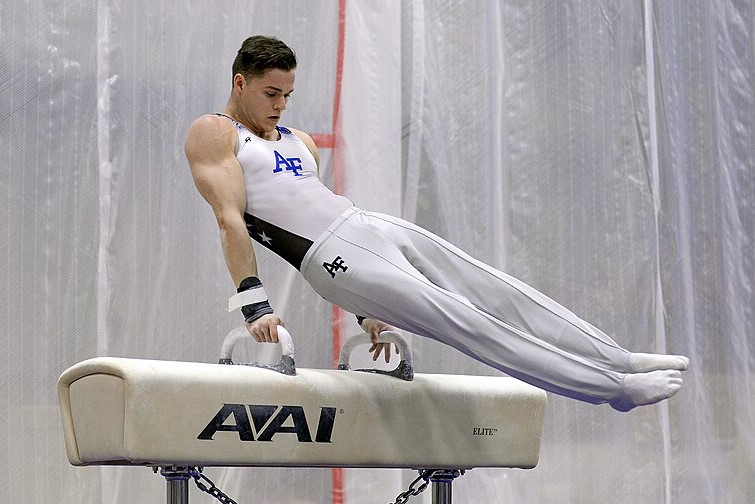
For every male gymnast, learning and mastering the circle is a requirement for the pommel horse. In this article, I’ll guide you through the mechanics of the circle, break down the key positions, and share effective drills and progressions to help you refine your technique. Whether you’re just starting out or looking to take your skills to the next level, understanding the circle will make a world of difference in your pommel horse journey. Let’s get started!
What is a Circle on Pommel Horse?
The most essential skill on pommel horse, the circle involves the gymnast swinging their legs from back to front in a circle.
At a simple level, to perform a circle:
- Starting in push up position, or front support, the gymnast swings their body sideways and forward while leaning onto one arm.
- Then, they reach behind them as their legs come forward to proceed to rear support.
- Finally, from rear support, the gymnast swings their body to the side and backward to return back to front support.
Circles can be performed on various pieces of equipment. In routines, gymnasts perform circles on the pommel horse. In training, athletes use other equipment besides the pommel horse, including buck horses, mushrooms, and even the floor. Most of this article will talk about learning circles on the mushroom.
Why Circles are Important to Pommel Horse?
Circles are the basic building block of almost all skills on the pommel horse. Three out of the four element groups involve circling and 85% of all skills listed in the FIG code of points derive from some form of circles. Therefore, mastering the circle is key to great pommel horse performance.
Positions and Principles: Preparing for Circles
Defining Some Basic Positions
Front Support
- Similar to a push up position, hands will be directly under the shoulders, the body straight out behind, hips facing the floor, and toes pointed.
- The body forms a completely straight line from shoulders to toes.
- The head should be neutral and looking diagonally out in front, not straight down at the floor, straight up, or ahead.
- Shoulders elevate pushing up tall, so as not to sag the shoulders or hips down to the floor.
Rear Support
- The reverse of the front support, hands will still be directly under the shoulders, but reach behind. With hips up, the body will stretch forward from the hands, with heels on the floor and toes pointed.
- Still forming a straight line from shoulders to toes.
- Eyes will now look at the toes.
- Shoulders elevated and shoulder blades pinched together in the back.
Side Supports
- With one hand directly under the shoulders, the side of the body will face toward the floor, with the hips pointed directly forward. The body should extend directly to the opposite side of the hand.
- Still forming a straight line from shoulders to toes.
- Eyes will still look diagonally out in front.
- The arm on the floor should push up as tall as possible, and the arm off the floor should be directly by the side of the body.
From these basic positions, we make a few adjustments to make the foundational “quarter” positions of a circle.
The Quarter Positions
The quarter positions of a circle represent snapshots of where the body should be and what it should look like at particular moments of the skill. For ease of discussion, we will assume the gymnast plans to circle in a counter-clockwise direction (Body moving to the right at the start of a circle).
Combining these positions in motion forms a circle, but usually, that is easier said than done. Before we talk about how to combine these quarter positions into a circle, let’s look at a few keys to perform great circles.
Points of Performance
During circles, a few points of performance indicate excellent circles. The second quarter is often the best snapshot to identify these details. Let’s define a few key technical terms:
“Ideal Position” – A stretched, open body with chest and hips square with the horse or mushroom. Hands on the same line. No Skew and No Rollover
“Open” – A straight line can be drawn from the shoulders through the hips, knees, and toes.
“Skew” – The degree of hand deviation from side-by-side. If one hand is further back than the other then there is skew.
“Rollover” – Degree of hip rotation from square. Rollover happens when the hips tilt in rear support in the direction the body is circling.
So during an excellent circle, the body should hit the second quarter in the “ideal position.” Likewise, a gymnast should keep that open body straight line the whole circle.
How to Do A Circle
Again, we will assume you are doing a counter clockwise circle. For clockwise circles, the quarter positions will be reversed along with the direction of the jump from start.
- Setup –
- Go to our Start Position.
- From there move your shoulders 3-6 inches behind your hands.
- Step your left foot to the side and back while lifting the right hand to your side. Keep the hips flat.
- Swing the right arm back onto the mushroom and jump the body toward first quarter. Keep the body straight.
- From start to first quarter –
- After jumping the body off the floor, swing the legs to the right.
- Lean the shoulders left.
- Lift the right arm and begin reaching it back behind the body. At this point you should be in first quarter.
- From first quarter to second quarter –
- Continue swinging the legs forward.
- Lean the shoulders back while reaching with the right arm down onto the mushroom.
- Now you should be at our second quarter point
- From second quarter to third quarter–
- Continue swinging the legs left, leaning the shoulders to the right now.
- Lift the left arm from behind the body and begin reaching it in front, entering the third quarter position.
- From third quarter back to start-
- Keep swinging the legs back toward where you started.
- Reach the left arm down in front of you onto the mushroom, while leaning the shoulders forward.
- Once the hand comes down and the legs are behind the body, you should be back at the start position with a completed circle!

Learning a Circle: Drills and Progressions
Drills for Positions
Static position holds and drills for shapes help athletes develop excellent quarter positions for the circle. A couple sets of drills I find particularly effective at developing strong quarter positions. Keep in mind that the athlete still needs to be maintaining the points of performance for an ideal circle while performing all drills.
Front support, rear support, and side plank holds all effectively test the quarter points. Static holds from 30s-2min help gymnasts develop endurance. You can add a wrinkle by having the athletes try and hold as still and tight as possible while providing resistance or attempting to move them. Another small tweak for gymnasts with wrist pain is to hold the planks on the forearms instead.
Support sliders challenge the gymnasts by adding movement to our static positions. Using furniture sliders on a carpeted surface, athletes can enter front or rear support with their feet on the sliders and walk across the floor. Walking forward and backward in both front and rear support is effective for getting athletes to learn to transfer weight from hand to hand. Weight transfer is an important concept for the start position and second quarter when the hands are changing on the mushroom. Meanwhile, the athlete is continuing to build endurance in the support positions.
Circle Progressions
While performing circle-specific progressions, I believe that continuing to emphasize the right body positions at the quarter points is vital. I find some progressions are excellent at reinforcing these positions while allowing the athlete to start building up and playing around with circles.
Walk to Quarters– The first step toward a circle is to understand the quarter positions. Walking from start to first, second, third, and back to start will help the athlete learn to hit each position while moving slowly.
Hop to Quarters– When the athlete can walk to each quarter successfully, we can add hops in. Instead of walking to each quarter the gymnast can perform mini hops with the legs together. The gymnast can start by stopping at each quarter before continuing hops, and then proceed to hopping continuously through the whole circle. This continues to progress from shapes to moving shapes.
Jump to Quarters– Instead of small hops, the athlete will now jump from the start to first quarter. At first, they can jump from start to first and then walk or hop to return, but over time they can jump from each quarter position to the next. This is a more difficult variation but it adds more time the athlete has to hold themselves up in support with just the upper body.
Half Circle with a Walk or Hop Back to Start– Once the gymnast shows a high degree of proficiency with the quarter positions and moving through them, they can start to try and half circle. When they do the half circle, they can pause at the second quarter to show an “ideal position” and then walk or hop back to start. As the gymnast improves, a coach can catch the gymnast at the second quarter and then help them complete the circle in the right shape.
3/4 Circle with a Return to Start– just like the half circle, except this time continuing to the third quarter showing excellent positions. When the gymnast can proficiently complete this drill, they will be in an excellent spot to make at least one circle.
Final Thoughts
A complex and difficult skill, the circle takes time to learn and even longer to master. Focusing on high quality quarter positions and the points of performance for an ideal circle will make the journey smoother. Patience, consistency, and hard work are the keys to learning a circle and pommel horse success!
For more pommel horse content, check these other articles:
– Simple Guide to Horse Part #1
– Simple Guide to Horse Part #2
– Common Horse Deductions
– Why Horse is So Difficult?
– Guide to Mastering Scissors